
Schenker Tech Class is a series of articles and videos by “Cruise RO Rich”: 
This series is intended to help Schenker watermaker owners better understand how their watermakers work and to review best practices for maintaining, servicing and troubleshooting their watermaker.
If you have a topic you would like to see covered, just email your request to [email protected]
SCHENKER WATERMAKER TECH CLASS SERIES:
+/- Schenker Tech Class 1: (Pressure adjustment when running your watermaker for: Sea Water, Fresh Water and Brackish Water.)
The differences between a Piston Pump watermaker and an Energy Recovery Pump watermaker come into highlight when you start talking about running your watermaker on the three possible source water streams: Sea Water, Brackish Water and Fresh Water. A Piston Pump uses a fixed back pressure valve to make the 800psi without feedback and needs to have it’s pressure manually readjusted, not just at the start and stop of each run, but also when changing water streams.
By contrast, the Energy Recovery pump self-adjusts the system pressure to achieve a set product water recovery rate (usually 10%). This means that for every 10 Gallons of water that flows through the watermaker, 1 gallon (or 10%) becomes fresh drinking water and the other 9 gallons (90%) goes overboard as brine. This self-adjusting is done via the volumetric rations of the product and brine reject streams by the Energy Recovery Pump. When you are running on pure sea water, the system self-adjusts to around 800psi to reach the set 10% recovery rate. Then when you are running on pure fresh water the pressure self-adjusts down to around 250psi to hit the 10%. Rather than setting a fixed pressure like a piston pump watermaker, the energy recovery pump sets a fixed recovery rate by the volume design of the pump cylinders and the pressure is self-adjusted up or down automatically to hit the set recovery rate. So you can be motoring through different salinity inlet water streams without worrying about damaging your RO Membrane due to “over-flowing” since the pressure will self-adjust.
This design characteristic means that energy recovery pump watermakers don’t have their production rates increase or decrease based on sea water properties like salinity and temperature. Additionally knowing this comes in handy when troubleshooting an energy recovery watermaker because by measuring the two flow rates (Product Water and Brine Water) you can check the performance of the Feed Pump and Energy Recovery Pump. When someone calls me with a problem, one of the first questions I always ask is, “what is your Product and Brine Water Flow Rates”. By adding these two flow rates together I know the Total Feed Pump Flow Rate and can calculate the Recovery Rate. For example, if you have a 30LPH watermaker (like the ZEN30) and you know it has a 10% recovery rate, then a properly working Feed Pump should be putting out a total of 300LPH with 270LPH of brine reject.
Cheers Rich Boren aka “Cruise RO Rich” SchenkerWatermakersUSA.COM
+/- Schenker Tech Class 2: (What happens when you hit the panel “On/Off” button?) 
It seems obvious that a button labeled “On/Off” on the standard control panel would start and stop the watermaker and that’s certainly true, but there are some other details about this simple button worth exploring.
When you push and release the On/Off button two things actually happen.The obvious is that the feed pump turns on sending water to the energy recovery pump and membrane to start making water. But at the same time the freshwater flush solenoid electro valve (EV) opens on the activated carbon filter. The purpose of the EV opening is to help prime the feed pump and take the priming load off of either the feed pump diaphragms or the procon vane pump (depending on the model you have).
Fresh water from your ships tank is used for 5-10 seconds to help prime the lines and feed pump. So this means operationally, you should have your ships pressurized galley water turned on when you go to start the watermaker or you miss out on this system priming assist.
It also means that if you have taken on dock water that contained membrane killing chlorine, you Must always maintain a fresh activated carbon filter in your system to remove the chlorine. (Fresh is defined as less than 6 months old from the day the activated carbon filter first got wet).
In addition to simply starting and stopping the watermaker, the On/Off button is also used to activate the timed runs of 1, 2, and 3 hours. A press and release of the On/Off button starts the watermaker and it will keep running until you hit the On/Off button again OR the Flush Button. (More on stopping the watermaker using the Flush button later). But if you press and hold the On/Off button you will cycle through a series of 3 flashes: One, Two and Three. Releasing the On/Off button after either the One, Two or Three series of flashes will automatically run the watermaker for that corresponding number of hours and then will shut the unit down with a freshwater flush.
So for example, if you want to make 16 gallons of water from the 8GPH ZEN30, you can activate the two-hour run by pressing and holding the On/Off button and letting go after the two flashes. Many cruisers will use this function when they want to make a certain amount of water and have the watermaker shut itself down. We do this ourselves while motoring and taking advantage of the “free alternator power”. Automatic shutdown with an end of run freshwater flush is one less thing to worry about while working on your boat in exotic places, which experienced cruisers know is the real-world definition of Cruising.
Cheers Rich Boren aka “Cruise RO Rich” SchenkerWatermakersUSA.COM
+/- Schenker Tech Class 3: Under Pressure Alarm Troubleshooting (As indicated by 3-Rapid Panel LED Lights Flashing)
The Schenker watermakers are equipped with a pressure transducer on the outlet of the feed pump. This transducer monitors the system pressure for both Low and High Pressure. When it senses low pressure, the feed pump is cut off and the remote panel indicates an “Under Pressure Alarm” by 3-Rapid flashes of the Basic Panel button LEDs. Here are some of the most common causes for this Alarm, along with the basic troubleshooting steps to identify and fix the Alarm.
Failed Pressure Transducer?
If you are unable to clear the air from the system and are continually seeing the Under Pressure Alarm, it is unlikely that you have a failed pressure transducer. When the pressure transducers fail, they normally exhibit a “Over Pressure Alarm” (4-Rapid Flashes on the Basic Panel) vs an “Under Pressure Alarm (3-Rapid Flashes). Under Pressure Alarms are usually associated with Feed Pump or Air Bubbles issues.
Air in the System:
Remaining air in the system or air bubbles being sucked into the suction side of the feed pump are the most common cause of the Under Pressure Alarm. This can happen after the raw water strainer is opened for cleaning or if one of the inlet-side hose clamps is loose and allowing air to enter when the inlet side plumbing is under a vacuum. It can also happen after a prefilter change until the air is pushed out of the system. To clear the Alarm, press the “on/off” button and the system can be restarted. Sometimes, especially during initial commissioning or after the boat has been stored on the hard and the inlet side water lines drain, it can take 3 to 4 on/off cycles to purge the air out of the system.
Detached Hose:
If one of the sea water lines upstream of the watermaker group comes detached, the system won’t be able to build pressure, and the pressure transducer will turn off via an Under Pressure Alarm. This feature came in very handy one day when I had a low-quality hose burst while running a unit on my test bench. When the system sensed a rapid decrease in pressure below the minimum threshold, the feed pump shut off, rather than continuing to spray sea water all over my work bench.
Failed Feed Pump Diaphragm:
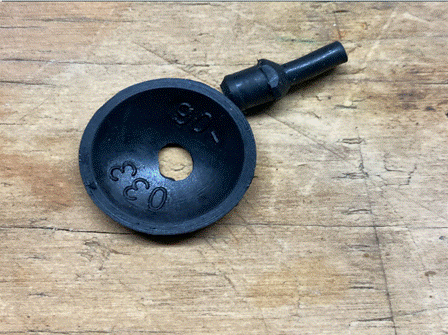
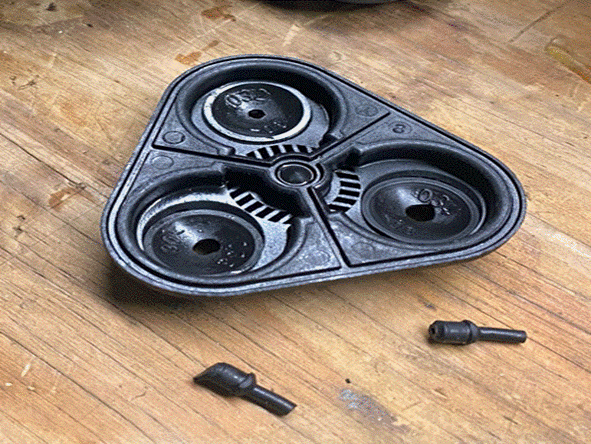
If the easy things have been checked, it could be that the system is unable to build pressure and will continue with a Under Pressure Alarm because there is a feed pump issue. A quick test to see if your feed pump can build pressure is known as a “Kink Test”. If you gently and SLOWLY kink the brine discharge hose with the feed pump running, while watching the system pressure gauge, you should be able to see the pressure start to rise. A healthy feed pump should be able to create 9-10-11Bar on the gauge, so as you slowly kink the brine discharge hose, you should see the pressure increase. If not, then it could be time to open up the feed pump head and verify that something isn’t inside the feed pump diaphragms or to make sure that the diaphragms themselves are not damaged. This holds true for Schenker watermakers that utilize the Procon vane pump as well as the diaphragm pumps. Now, a word of caution here: If you kink the hose too quickly and are not paying attention, you CAN cause the pressure to rise too quickly, and a hose can pop off and spray you and your nearby electrical equipment.
I have attached a photo of a failed feed pump diaphragms. You can see the diaphragm cup guides broken off from the center of the cups, which keeps the pump from being able to build pressure.
Bypassing Pressure Transducer for Testing:
I often find it easier to purge air and troubleshoot Under Pressure Alarms by bypassing the system controls and running the feed pump directly by using the “Bypass Switch” inside the electrical control box. When the feed pump is turned on directly, it bypasses the pressure transducer which can allow you to help prime and troubleshoot the system. Now, you have to be aware of two important issues to keep in mind when running the watermaker with the bypass switch.
First, you have NO Pressure Alarms and Cut-offs. So you have to pay attention and make sure to not over-pressurize the system, which can cause watermaker damage. So this isn’t something you do Willy-Nilly without paying attention to the pressure gauge.
Second, the diaphragm pumps can briefly run dry without damage. However, running the Procon vane pump dry without a positive supply of sea water being pushed into the inlet WILL DAMAGE the pump head. So if your model of watermaker has a Procon vane pump, you can NOT engage the feed pump bypass switch without a positive supply of water being fed into the pump.
Finally Remember Rule No 1 of Watermaker Troubleshooting: Ask before you make it worse!
Whenever I dive into details of watermaker troubleshooting, it’s important to remind everyone that you don’t want to make something worse! Schenker watermakers has top level customer support, so we strongly recommend that you contact a Schenker dealer/technical representative before you start taking things apart and doing troubleshooting tests. A quick discussion and review of your situation can save you time and effort in troubleshooting the problem and make sure new problems and not created in the process.
I fell a bit behind with back-to-back boat shows, but the weekly Schenker Tech Classes are archived on our website at this link:
https://schenkerwatermakersusa.com/schenker-watermaker…/
Cheers
Rich Boren
Schenker USA
 —
— —
—